

Hi! If are you a web developer o simply want to try to program, surely needs some software in order to do your job. Specifically, a webserver like Apache, a programming language like PHP and a database like MySQL. These programs mentioned have great popularity at the present time, even though there are other tools to use, MariaDB for example. Under those circumstances, we can install it one per one (please check our tutorial about install Apache on Windows 10). Or there is also the opportunity to use software packages that include all the mentioned programs. In this opportunity, we will talk about XAMPP. It is an independent free code platform server. It allows us to easily install Apache on our own computer, regardless of our operating system. XAMPP is an open-source package and free. It is a development tool that allows us to test the work on our own computer without having to access the internet. So, let´s see how to install Xampp on Windows 10.
Installing XAMMP on Windows 10
To start, we must go to XAMMP site in order to download the last package ( 7.3.7 / PHP 7.3.7).

Next, we have to run the executable file. If the User Account Control (UAC) has been activated, then a warning sign will appear. In this case, all we have to do is not to install the program into C:\Program File, or simply deactivate UAC.

Obviously, all of the conscious users have an antivirus program running in his PCs, but maybe it can slow down or interfere with the software´s installation. We recommend deactivating antivirus until setup finishes its work.

Now we are ready to start the installation

In the next window, we have to select all the components to install, it is very recommendable to choose it all. Please select Next to continue.

Select the destination folder to install. Regarding UAC issue, is highly recommend to install on C unit. Please select Next to continue.

The following screen provides information about the application installers for XAMPP created by Bitnami. Please select Next to continue.

Once prerequisites have been satisfied, setup finally will begin to unpack and install XAMPP.

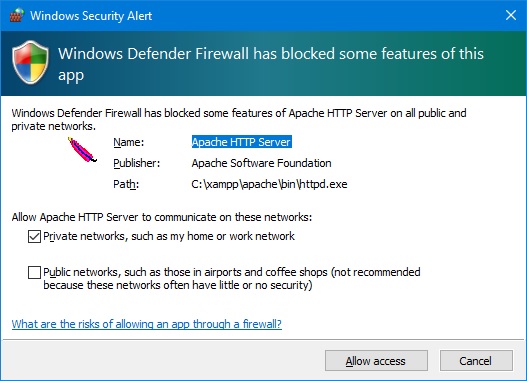
During the installation, a Windows firewall notice will be displayed to authorize Apache to communicate on private or public networks. Mark private network and click Next to continue.
Finally, the setup has completed the installation and we can start de Control Panel

XAMPP first running
Choose the software´s language.

The XAMPP icon will appear in the lower right corner of the screen. We double click on it to open the Control Panel.

By default, only the tomcat module will start, and the rest will remain stopped. In the panel, we need to press start to activate it and authorize the connection through the firewall.


Testing XAMPP on Windows Server
Once we have the Apache server running, we can test the XAMPP dashboard, typing localhost in the browser bar.

Finally, XAMPP has been successfully installed in the system. From now on if we want to start it, we just have to access the installation path, C: \ xampp and click on xampp-control. For convenience, we can create a shortcut to the desktop, and start it from there

Well, this has been everything for today, as we can see the installation process is very simple. So, you know how to install Xampp on Windows server. Enjoy it.
