Hi! We have previously discussed options for setting up a web server on Windows 10. Indeed, we discussed alternatives such as XAMP, WampServer and EasyPHP Devserver. Each of them has its advantages and disadvantages. However, a common point is that each solution incorporates the necessary elements to successfully run a web server. Well, today we take a look at Laragon. As its name suggests, it was originally oriented to Laravel. Since its features optimize the use of this framework. However, it can be used for any PHP project. In addition, it has some features that make it unique. Read on to learn how to install Laragon on Windows 10.
Main features of Laragon for Windows 10
As mentioned, this toolkit has distinctive elements. First, it incorporates Apache, MariaDB, PHP, phpMyAdmin, cmder, Memcached and much more. In addition, it allows the creation of automatic Virtual Hosts for projects. That is to say, if we create a project called laravel-project.dev; then it is enough to enter that address in any browser to see it running. It also allows you to use pretty URLs. That is, it generates the url laravel.test instead of localhost/laravel. Therefore, it is not necessary to modify any file. Likewise, its operation is portable. Consequently, you can move the Laragon folder to another computer. You can even upload it to cloud hosting services. And continue using it on those devices.
It is also configured inside containers, so it runs in isolation from the rest of the system. This guarantees greater stability and lower resource usage. Additionally, it allows you to create projects (WordPress, Laravel, Drupal, etc.) with just one click. You can add git, phpmyadmin, Node.js/MongoDB, Python/Django/Flask/Postgres, Ruby, Java, Go using Tools>Quick add.
Laragon versions
Laragon is an open source project available only for Windows. So its operation is optimized for this operating system. In fact, the developers claim that the Laragon Core consumes only 4 MB of RAM. So far, 3 versions of the program have been released.
- Laragon Full: Apache 2.4, Nginx, MySQL 5.7, PHP 7.2, Redis, Memcached, Node.js 11, npm, yarn, git.
- Lite version: Don’t include Node.js 11, npm, yarn, git but you can add them easily using Tools>Quick add.
- Portable version: PHP 5.4, MySQL 5.1 – Good for getting started with PHP, then you can add newer versions of PHP/MySQL easily later.
How to download and install Laragon for Windows 10.
We have seen the different versions of this tool. Well, for the purposes of this tutorial we will install the full version. You can download it for free from this link. The installation of the program is as usual as any other.

From there, just follow the installation windows. However, you must check the Auto virtual hosts option to be able to enjoy this functionality.

Then wait while the installation process completes. Finally, you can launch the app.

Adding features in Laragon.
As mentioned, Laragon comes ready to use. In fact, it incorporates MySQL. It also incorporates HeidiSQL to manage it. However, you can install another MySQL manager. In this opportunity we will install PHPMyAdmin. It is a simple process that we will do with a single click. Since the tool downloads, unzips and places the file in the necessary location. Well, you just have to right-click on the app console. Then follow the following path:
Tools>Quick add>phpmyadmin

As mentioned above, the process is carried out automatically.

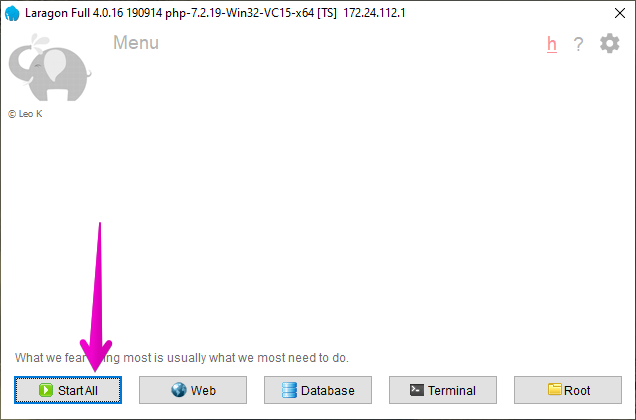
After the installation is finished, we will finish the PhpMyAdmin configuration. The first thing you have to do is to start all Laragon services. With this in mind, click on Start All.

Then paste the following address into a web browser:
http://localhost/phpmyadminThe main phpMyAdmin window will be displayed immediately. If using a local development environment, then use root as the username and leave the password blank.

After a few moments the tool will be ready for use.

We are ready to create our first project in Laragon.
Creating a project in Laragon
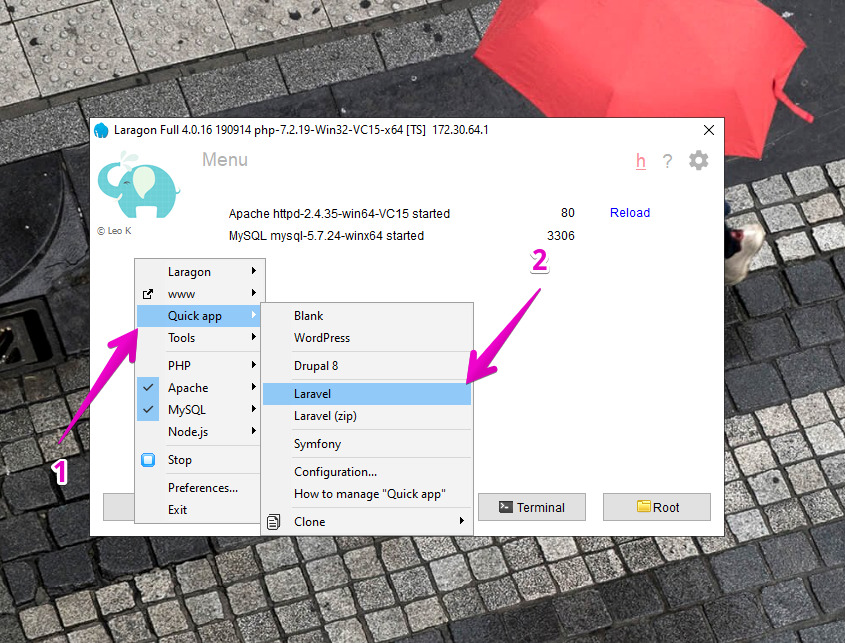
As mentioned, Laragon offers to create a project with a single click. It is possible to generate any PHP related server. But this time we will create a Laravel project. With this in mind, right-click on the mouse and follow this path:
Quick app>Laravel

Next, assign a name to the project.

Then the download, installation and configuration of the new project will start. This is done automatically. In addition, it may take a few minutes depending on the speed of the connection.
Finally, you can launch the project page. This can be done in two ways: by right-clicking the mouse and following the next path:
www>osradar

Please remember to replace osradar with the name of your project. On the other hand, Laragon generated the following pretty URL. So just add it in the address bar of the web browser.
http://osradar.test
Either way, you will see the following in the web browser.

This way we have seen how to install Laragon on Windows 10. So long!


