Hello friends! WhatsApp Stickers is one of the best features that were introduced, which came to stay and is currently one of the most used. The normal thing is that you save the Stickers that your contacts usually send you. But it is possible to make your personalized Stickers, using any photo you have taken with your phone’s camera. You can also create Stickers from images you download from the internet. And you can even make several Stickers and create your pack for easier access to them. It’s a relatively simple process that won’t take you much time. In this post, we will show you how to create your WhatsApp Sticker pack.
Choosing the image
To begin with, you need to locate an image that is suitable for making into a sticker. You can take one from your phone camera. If this is the case. I recommend that the background of the image be a neutral color. It will be necessary to make the editing process easier. In the case of images downloaded from the web, it will be necessary that they have a background of a single color. For example, white or black.
How to remove the background of the image
Now you must remove the background of the image to get a better aesthetic result, this step will be easier depending on the background of the photo. You can also choose not to remove the background, but this would make the Sticker not be seen so clearly due to its reduced size. To remove the background you need the Background Eraser application. You can download it by following this link:
Google Play | Background Eraser
First step
Open Background Eraser and tap the “Load a photo” button.

Second step
Then open the photo you want to edit

Third step
After that, crop the image leaving as little background as possible.

Fourth step
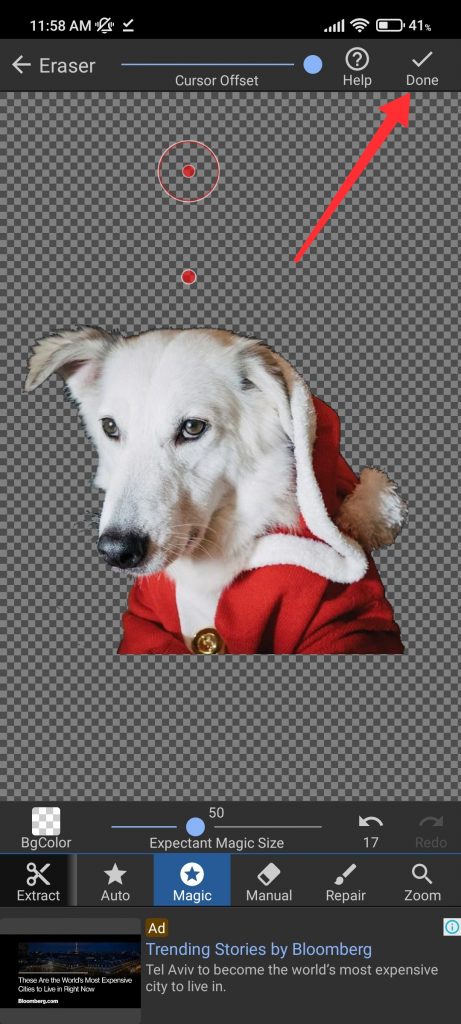
Next, select the “Auto” option and tap anywhere in the background. The background should be deleted automatically. You can also use the “manual” tool and “magic” to manually erase some excess. If you erased too much you can use the “Repair” tool to correct it.

Fifth step
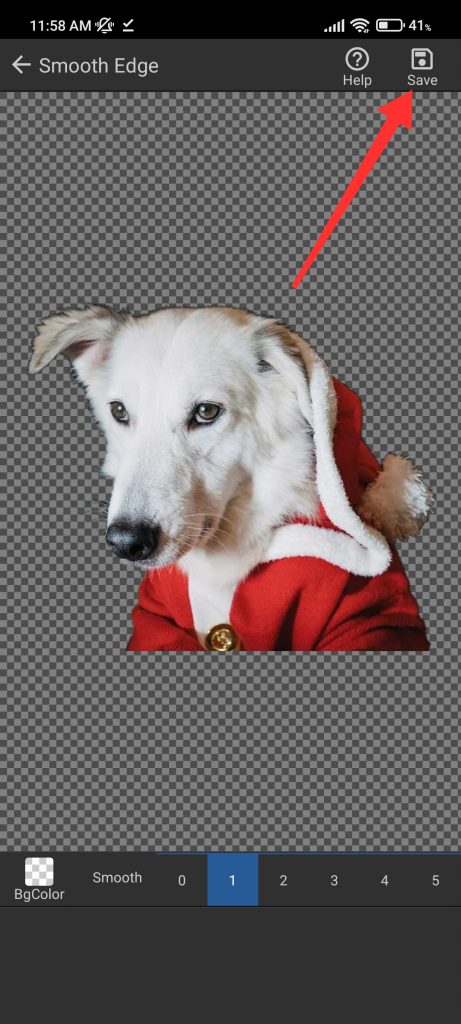
Then, tap the “Done” button located in the upper right corner. To finish, press the “Save” button.


How to create the Sticker Pack
Once you have cut out your images by following the above steps, which should be at least three. You need to download the application “Personal Stickers” which is a free and quite simple app that will allow you to create your packs and upload them directly to WhatsApp. To download it you can do so by following the link below:
Google Play | Personal Stickers
First step
Open the application and tap the button “Create your new Sticker pack”.

Second step
Then open the newly created pack to edit it.

Third step
After that, tap the “Add Sticker” button.

Fourth step
Next, press the “Allow” button to grant it access to your device’s photos and internal storage.

Fifth step
Then, select the photos and then tap the “Load” button. Remember that there are three photos and you must add them one by one.

Sixth step
Finally, tap the “Add to WhatsApp” button. You will find your new Sticker pack in the Stickers section of any WhatsApp chat.


Conclusion
As you could see creating your custom stickers for WhatsApp is a relatively simple and quick process. There are infinite possibilities to make the stickers you like the most. Plus you can share them with your family and friends. Thanks for reading us. Bye!


